Indulge in the irresistible flavors of this bakery-made treat right from the comfort of your kitchen with the help of this Copycat Panera Bread Glazed Orange Scone Recipe.
These scones are bursting with zesty citrus notes and have a tender crumb. Whether you're a seasoned baker or making scones for the first time, our step-by-step guide will show you how to recreate the magic of Panera's orange scones.
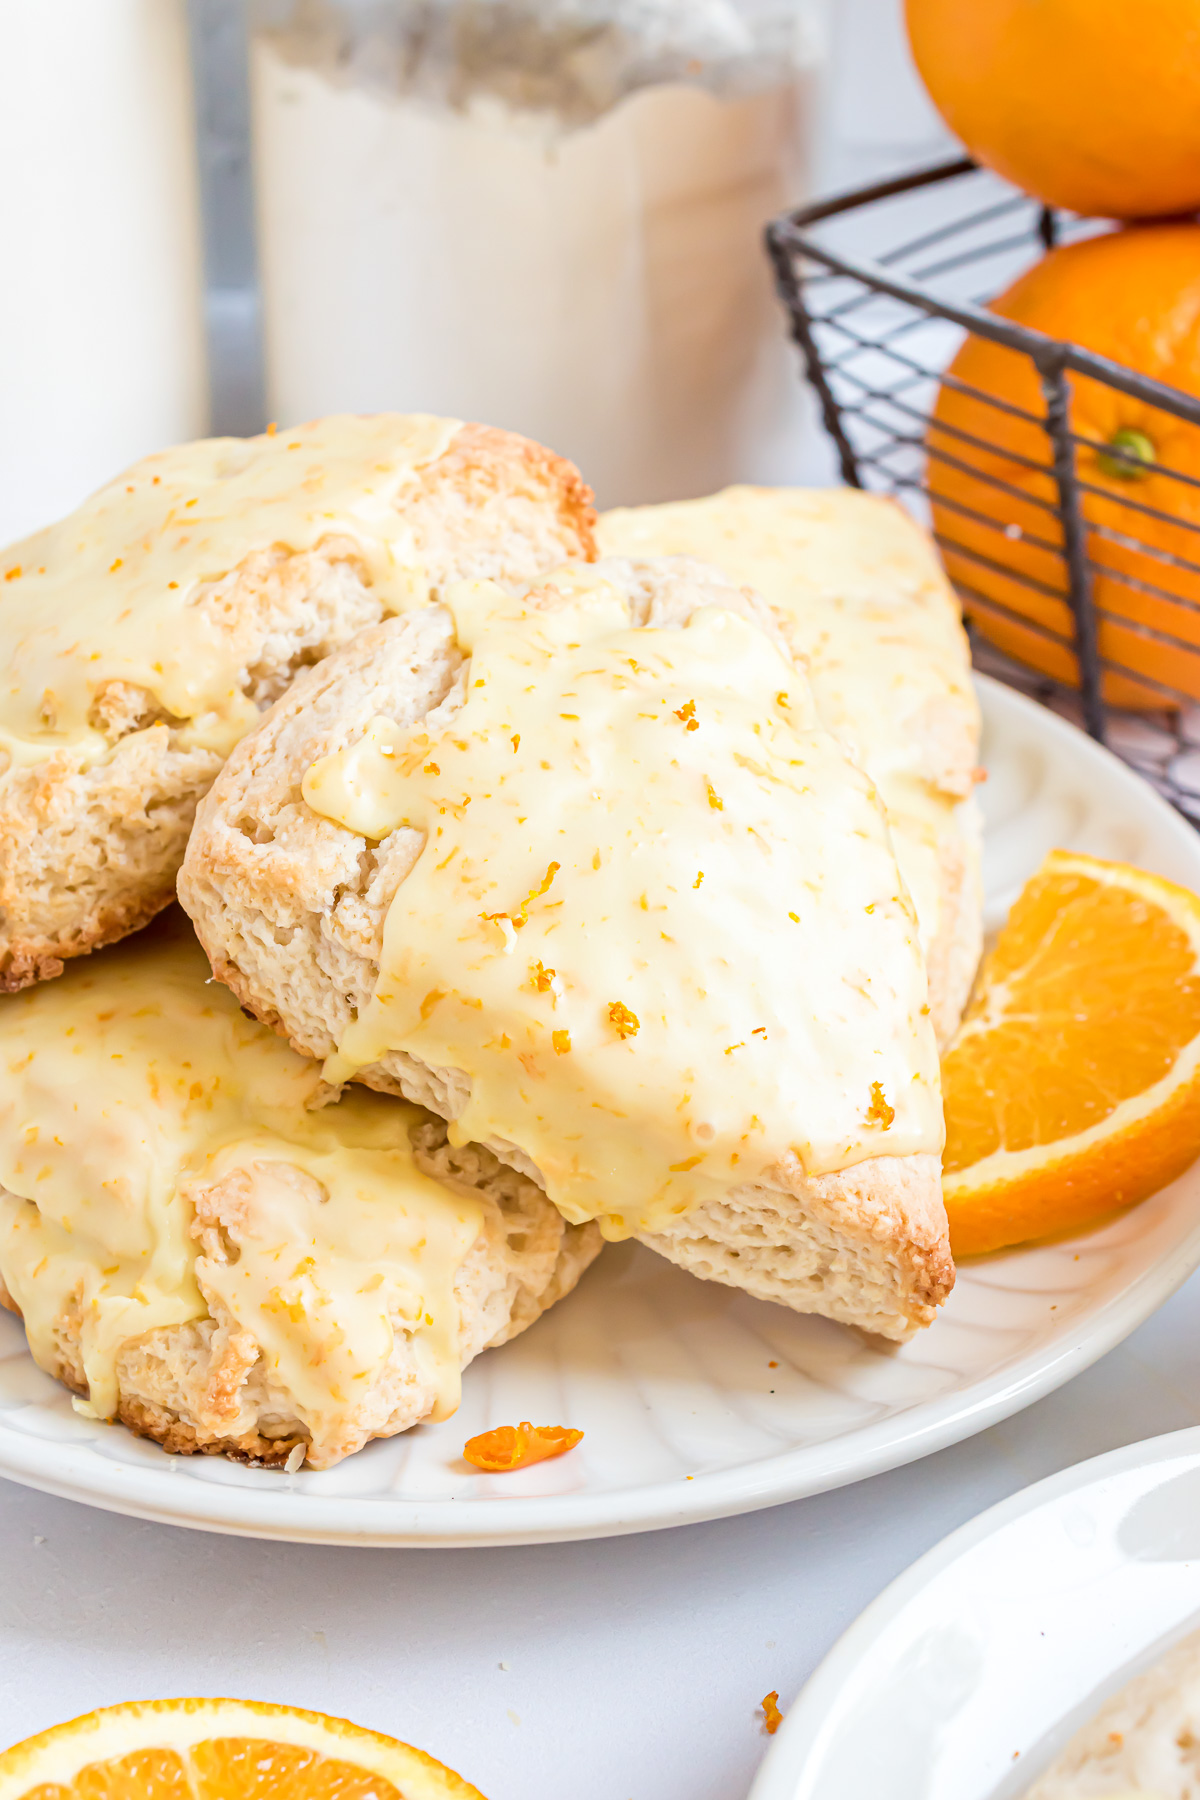
This easy orange scone recipe is complete with a luscious glaze featuring a bright orange flavor, provided by orange extract, and orange zest and juice, that adds the perfect finishing touch. Prepare to be the most popular house in town for a breakfast meet-up or coffee break with these homemade flaky scones.
If this recipe leaves you wanting more of Panera's menu, we have a few more copycat recipes for you. Try our Pumpkin Muffin Recipe or our Copycat Kitchen Sink Cookie.
Flaky Scone vs. Crumbly Scone - What's the difference?
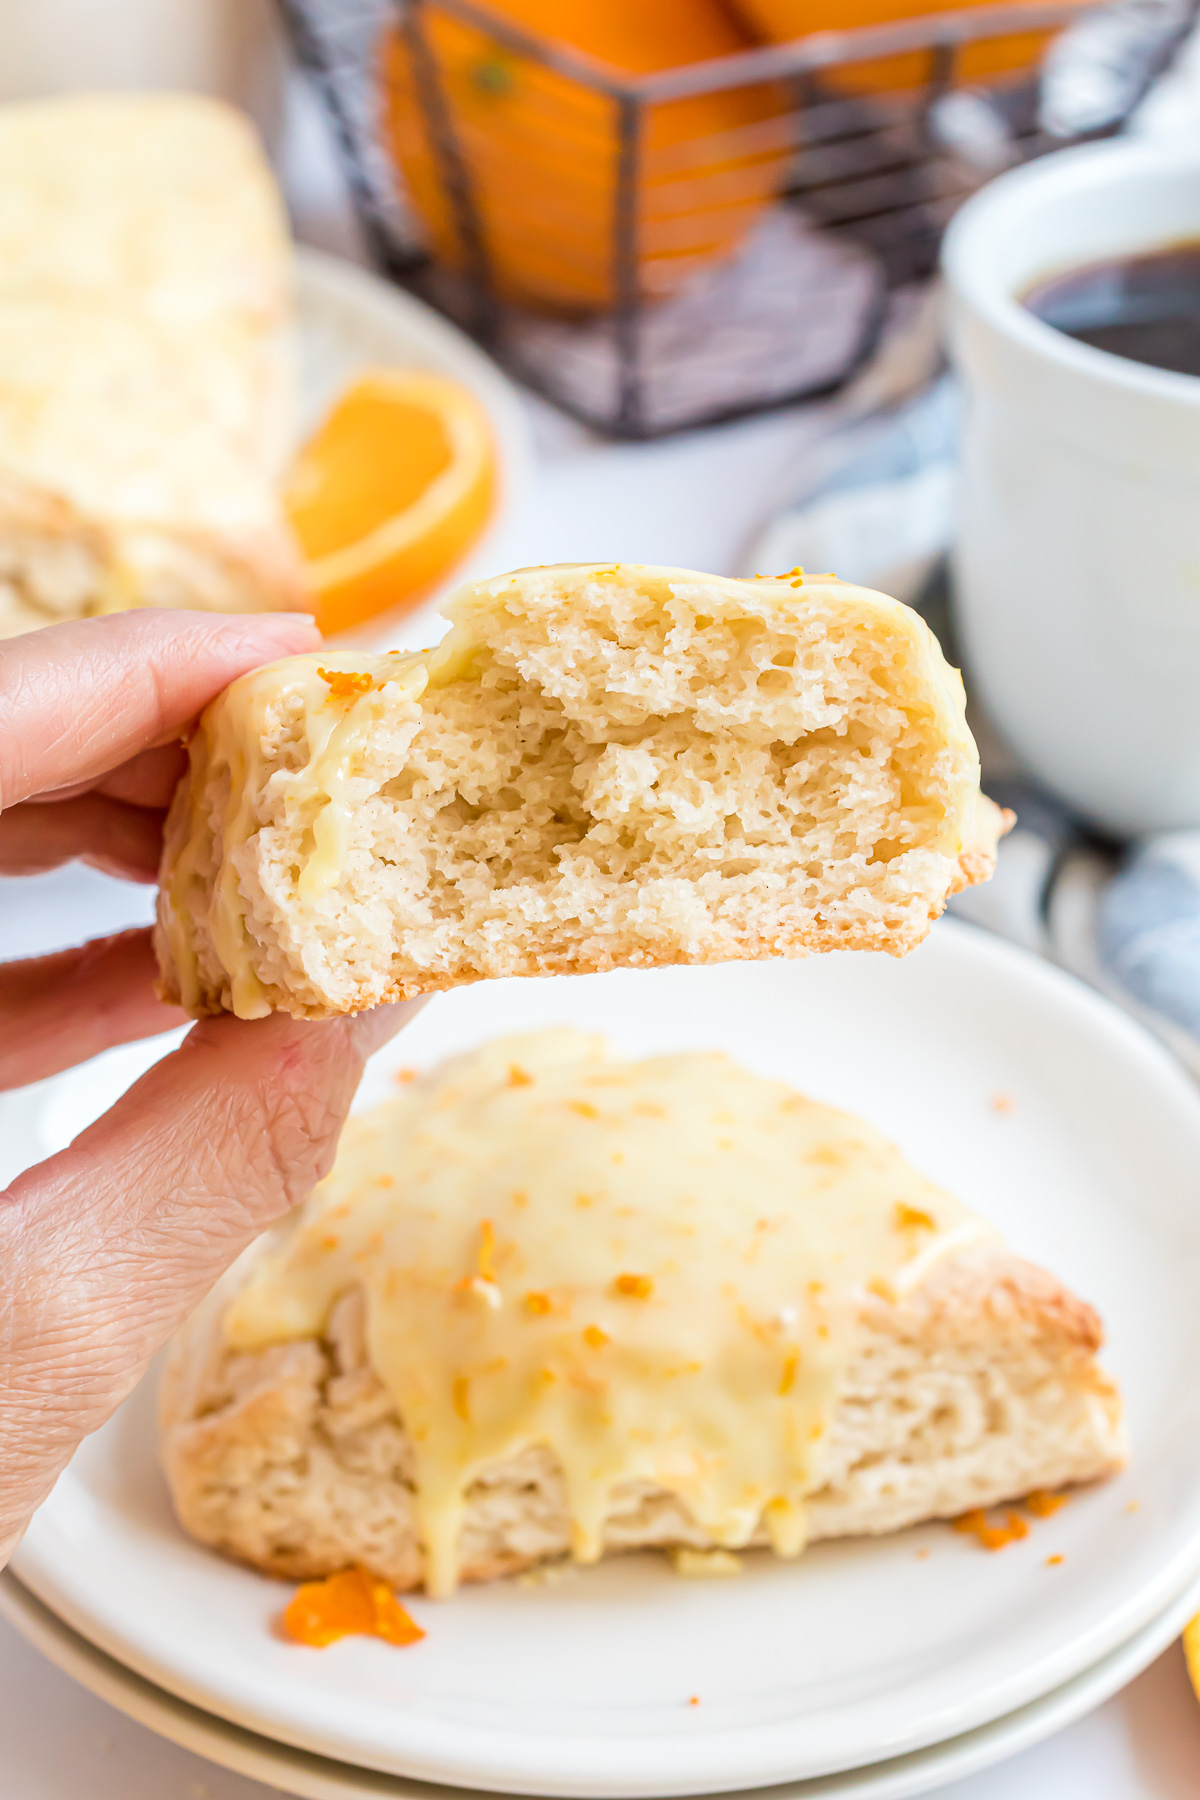
So, what are the secrets to making these copycat flaky orange scones? The major differences between a flaky and crumbly scone are in the overall texture of the scone, the method used to incorporate the butter, and the technique used once the dough comes together.
Flaky scones have a layered and tender texture with distinct, well-defined layers that separate when you break the scone apart. These layers contribute to a light and airy texture. As in our recipe for Panera Orange Scones, we achieve this flakiness by grating the cold butter into the dry ingredients. The dough is worked gently. As the scone bakes, the small pieces of butter create steam pockets, causing the layers to separate and create a flaky texture.
Crumbly scones have a more delicate and crumbly texture. The butter is often cut into the flour mixture more thoroughly to make crumbly scones, resulting in coarse crumbs. This creates a finer, more uniform texture throughout the scone instead of flaky layers. When mixing the dough for crumbly scones, you may work the dough slightly more than with flaky scones, but you still want to avoid overmixing to prevent toughness.

Why You’ll Love This Recipe
- Quality Ingredients and Customization - When you make something in your kitchen, you can control what goes into your baked goods. You can use that flour that never fails and that orange extract you love. You can also choose healthier options like whole wheat or gluten-free flour, a reduction in sugar, or a dairy-free option that works for you.
- Personal Touch - Baking at home allows you to add your personal touch and creativity to the scones. You can experiment with shapes, sizes, and even glazes to make the scones uniquely yours. They are a great little treat to share with neighbors or friends. Sharing baked goods can spread joy and showcase your baking talents. Plus, baking at home makes a cozy and inviting space. So inviting a guest over for coffee is a no-brainer.
- Cost-savings and Freshness - Making scones at home can be more cost-effective than buying them at a café. You'll likely end up with a batch of perfect scones for a fraction of the price you'd pay at a bakery. You can make exactly the amount you need, reducing food waste and ensuring that you consume the scones while they are at their best.
Equipment
- Whisk
- Grater
- Zester
- Sharp knife or pizza cutter
- Parchment Paper or Silpat
- Large Mixing Bowl
- Large Baking Sheet
Ingredients
- All-Purpose Flour
- Granulated Sugar
- Baking Powder
- Kosher Salt
- Unsalted Butter
- Full-Fat Sour Cream
- Milk
- Orange Extract
- Powdered Sugar
- Fresh orange juice
- Fresh orange zest
*For specific ingredient amounts, please scroll down to the recipe card.

Substitutions
- Whole-wheat flour: You can swap out the all-purpose flour for whole-wheat flour for a nuttier flavor and added nutrition. Keep in mind that whole wheat flour may result in slightly denser scones.
- Salted butter: If you only have salted butter on hand, use it and omit the additional teaspoon of kosher salt in the recipe.
- Full-Fat Greek Yogurt: Greek yogurt is a common substitute for sour cream in baking. It provides a tangy flavor and similar moisture content.
Variations
Because our goal was to create an authentic copycat recipe, the following variations are suggestions for adding different flavors to our recipe.
- Cranberry Orange Scones: Add dried cranberries to the scone dough for a burst of tartness and festive color that complements the orange flavor beautifully.
- Chocolate Orange Scones: Incorporate mini chocolate chips or finely chopped dark chocolate to create a delectable chocolate-orange combination that's both indulgent and satisfying.
- Almond Orange Scones: Fold toasted sliced almonds into the dough for a nutty crunch that pairs well with the citrusy orange notes.
- Cardamom Orange Scones: Add a pinch of ground cardamom to the dry ingredients to infuse the scones with a warm, aromatic flavor that complements the orange zest.
- Coconut Orange Scones: Incorporate shredded coconut into the dough for a tropical twist that adds flavor and texture.
- Ginger Orange Scones: Mix in finely chopped crystallized ginger for warmth and a hint of spice that pairs well with the orange flavor.
- Cream Cheese Glaze: Instead of the orange glaze, try a cream cheese glaze by mixing softened cream cheese with powdered sugar and a splash of vanilla extract for a rich and creamy topping.
Instructions
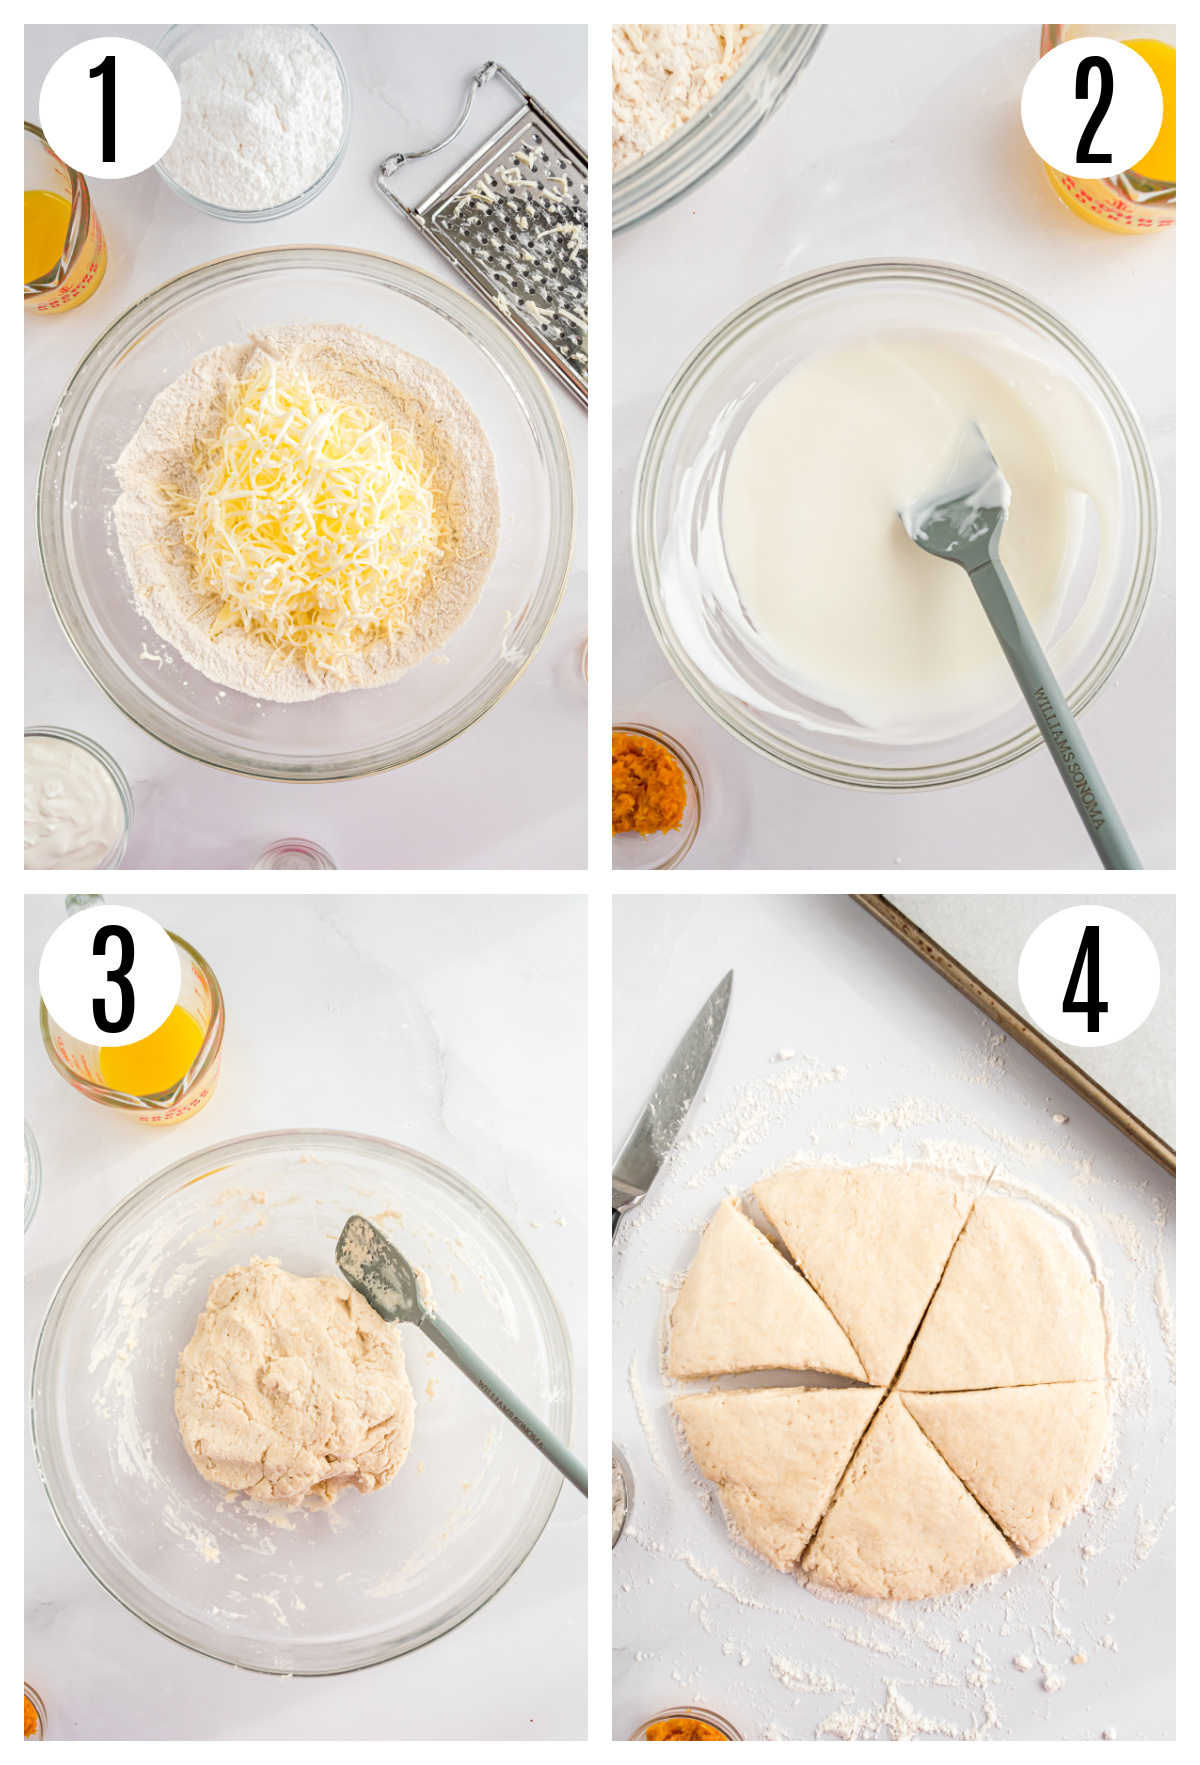
Step 1. Preheat your oven to 375℉ degrees. Line a large baking sheet with parchment paper and set aside.
Step 2. Whisk flour, sugar, baking powder, and salt together in a large bowl.
Step 3. Grate butter into the flour mixture using a box grater with large holes. Toss the butter and flour gently with your hands to coat the flour with the butter. Set aside.
Step 4. Mix the sour cream, milk, and orange extract in a small bowl until blended.
Step 5. Add the sour cream mixture to the flour/butter mixture and gently bring it together with a spatula or large spoon. Don't overwork the dough.
Step 6. Place it on a lightly floured surface. Knead and form dough into a 6 or 7” circle, about 1¼“-1 ½” thick. No need to knead more than 2 or 3 times. Cut the dough disc in half and then cut each half into three triangles. You will have six triangles in total.
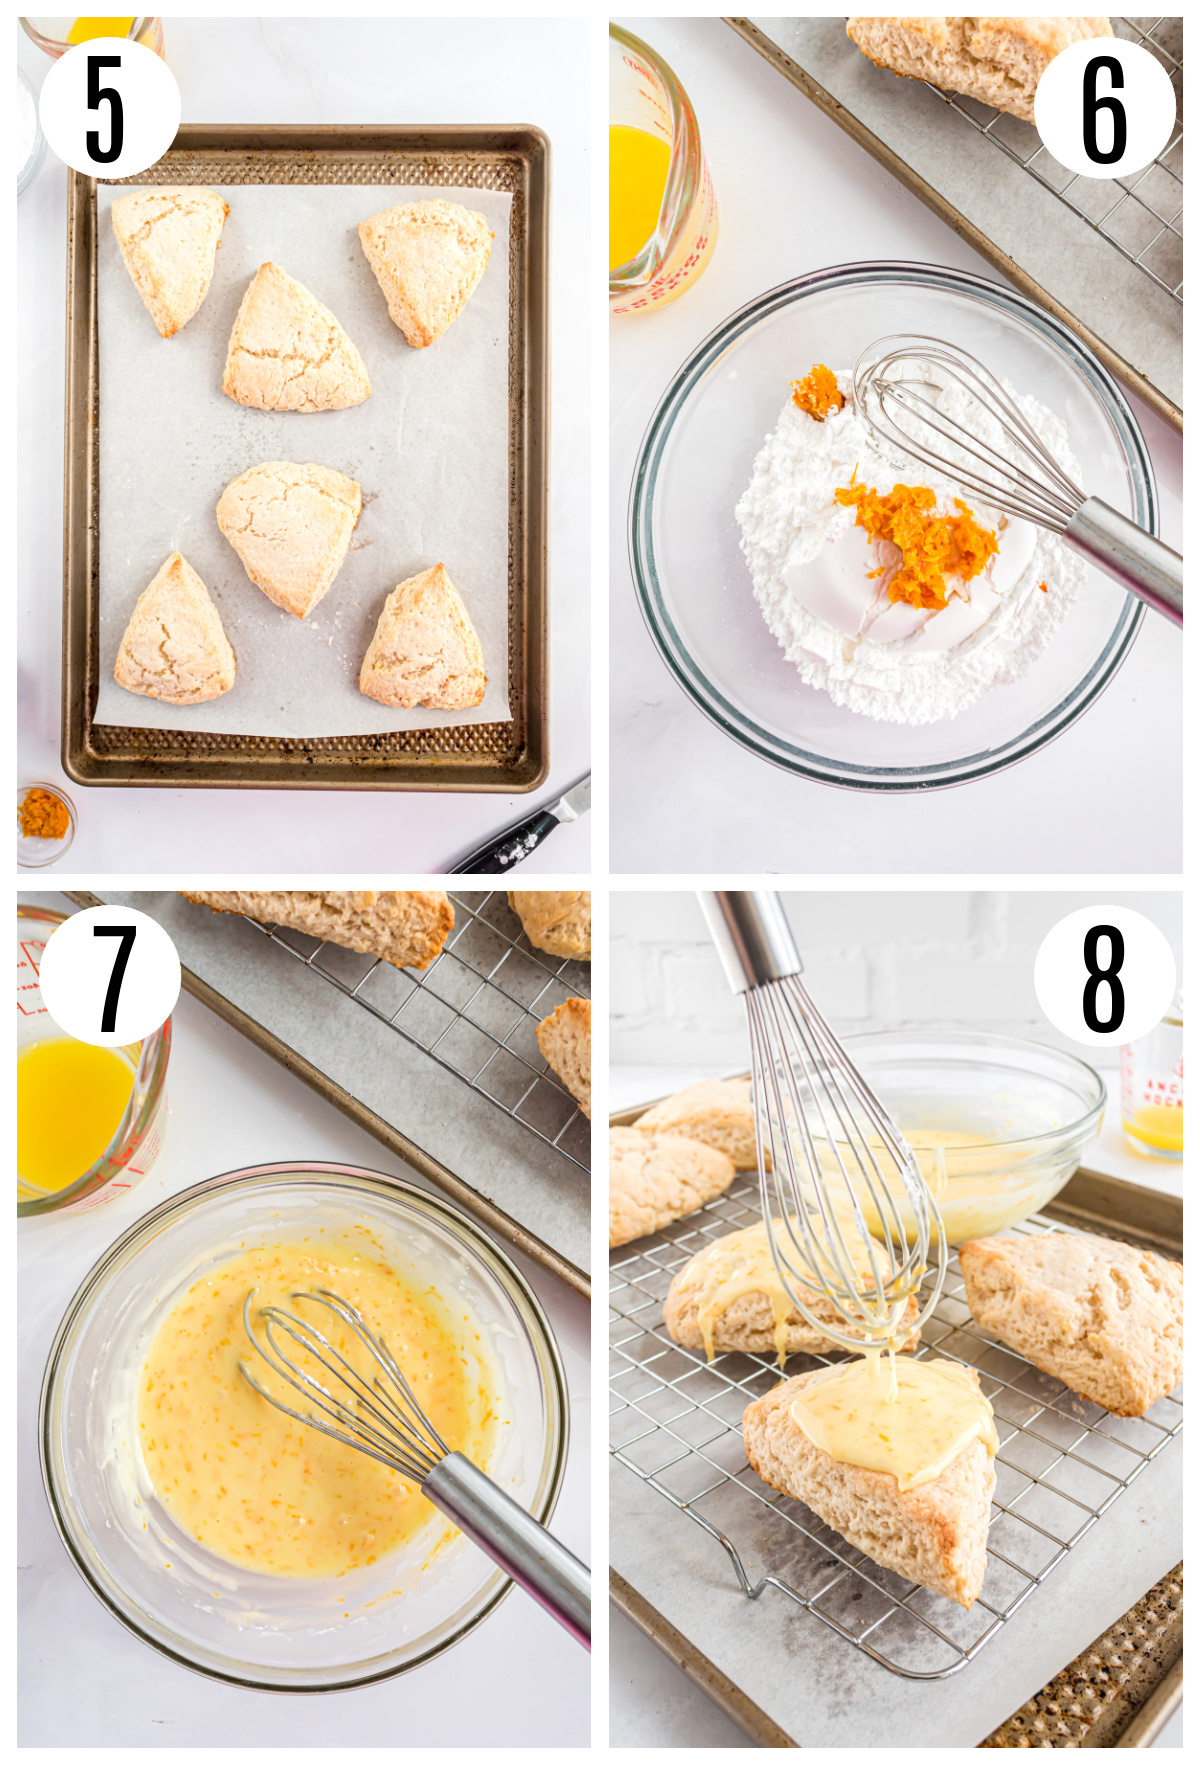
Step 7. Place unbaked scones on the prepared baking sheet, spacing them about 2 inches apart.
Step 8. Bake scones for 12-14 minutes until they are light golden brown. Cool the scones on a wire rack.
Step 9. While the scones are cooling, make the glaze. Mix the powdered sugar, orange zest, and orange extract in a medium bowl. Add the orange juice, a little at a time, until desired consistency. You may need more powdered sugar and juice (or a little water or milk) to thin the glaze if it's too thick.
Step 10. Spoon glaze over the cooled scones. Allow the glaze to set for about 20 minutes.
Storage and Freezing
Store in an airtight container in a single layer at room temperature for 2-3 days.
We recommend freezing the scones before glazing them. Wrap the orange scones individually with plastic wrap, place them in an airtight container or freezer bag, and store them for up to 3 months. Thaw the frozen scones at room temperature overnight, and then glaze them.
Pro Tip
When I zested and juiced a large orange for this recipe, I got about ½ Tablespoon of zest, and ¼ cup of fresh orange juice. I added all the zest to the glaze. But I only added a portion of the juice (about half of the amount) until I got the consistency I wanted.
For scones that are a little smaller, you can cut a large dough disc into eight triangles. The baking time for the smaller scones will need to be adjusted to 10-12 minutes.
If you make this Copycat Panera Bread Glazed Orange Scone Recipe, I'd love to hear about it. Please leave me a comment and give this recipe a star-rating.
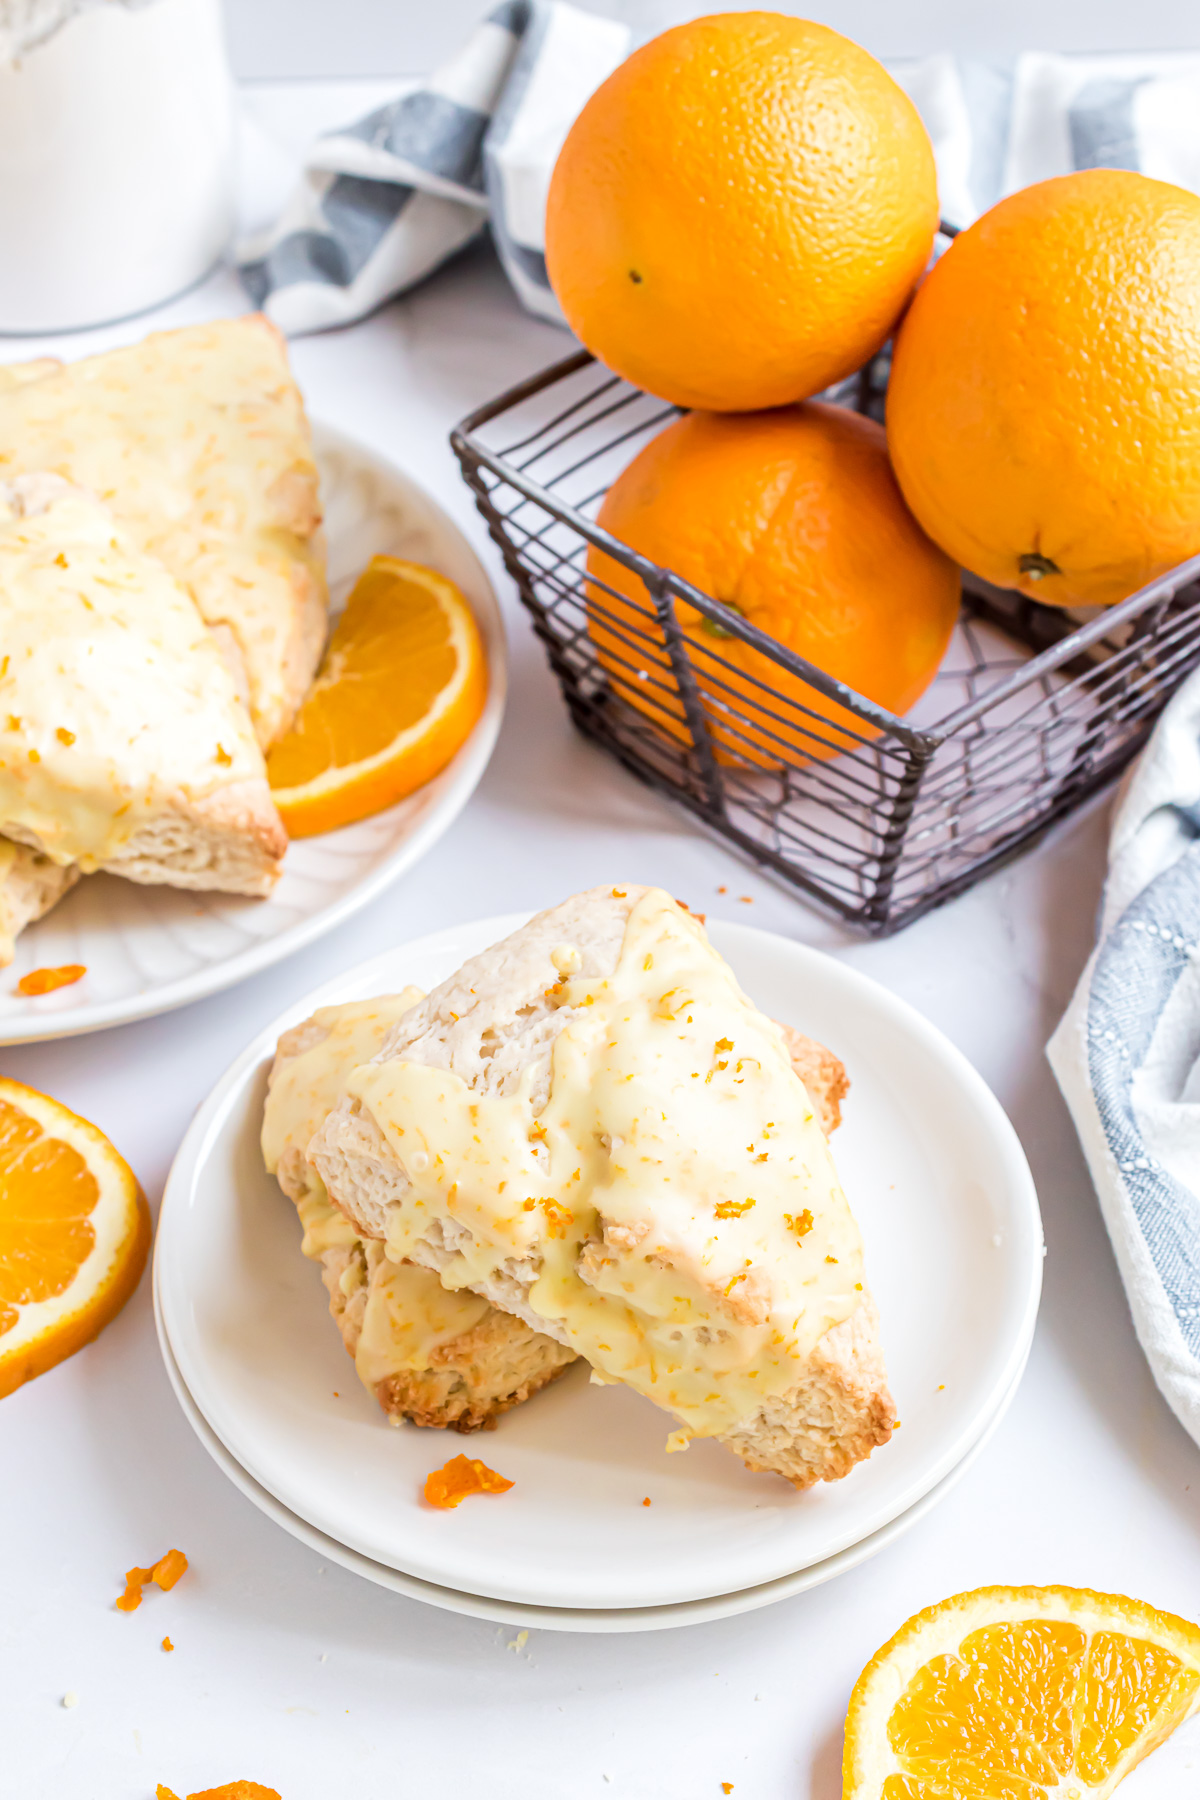
While scones and biscuits are quick breads and share some similarities in their basic baking technique, they are different. Scones are often associated with a more indulgent and sweeter experience than traditional biscuits due to added sweeteners and flavorings. They have a crumbly and tender texture and may feature glazes or toppings. Biscuits are usually savory, made with simple ingredients like flour, baking powder, butter, and milk. Unlike a scone, biscuits usually are served as a side dish to complement a meal. Scones can be served as the main breakfast item or treat.

More Recipes You Might Enjoy
- Hello Dolly Cookie Recipe
- The Best 3-Ingredient Banana Cookies (no peanut butter)
- Brioche French Toast Casserole Recipe

Copycat Panera Bread Glazed Orange Scone Recipe
Equipment
- Whisk
- Grater
- Sharp knife or pizza cutter
- Parchment Paper or Silpat
- Large Mixing Bowl
- Large Baking Sheet
Ingredients
- 2 cups all-purpose flour
- ⅓ cup granulated sugar
- 1 Tablespoon baking powder
- ½ teaspoon Kosher salt
- ½ cup unsalted butter very cold
- ½ cup full-fat sour cream
- ¼ cup milk
- 1 teaspoon orange extract
Sweet Glaze Ingredients:
- 1½ cups powdered sugar sifted for best results
- ½ Tablespoon fresh orange zest from one large orange
- ¼ cup fresh orange juice from one large orange
- ½ teaspoon orange extract
Instructions
- Preheat oven to 375℉ degrees. Line a large baking sheet with parchment paper and set aside.
- Whisk flour, sugar, baking powder, and salt together in a large bowl.
- Grate butter into the flour mixture using a box grater with large holes. Toss the butter and flour gently with your hands to coat the flour with the butter. Set aside.
- Mix the sour cream, milk, and orange extract in a small bowl until blended.
- Add the sour cream mixture to the flour/butter mixture and gently bring it together with a spatula or large spoon. Don't overwork the dough.
- Place it on a lightly floured surface. Knead and form dough into a 6 or 7” circle, about 1¼“-1 ½” thick. No need to knead more than 2 or 3 times. Cut the dough disc in half and then cut each half into three triangles. You will have six triangles in total.
- Place unbaked scones on prepared baking sheet, spacing them about 2 inches apart.
- Bake scones for 12-14 minutes until they are light golden brown.
- While the scones are cooling, make the glaze. Mix the powdered sugar, orange zest, and orange extract in a medium bowl. Add the orange juice, a little at a time, until desired consistency.
Notes
Store in an airtight container in a single layer at room temperature for 2-3 days. We recommend freezing the scones before glazing them. Wrap the orange scones individually with plastic wrap, place them in an airtight container or freezer bag, and store them for up to 3 months. Thaw at room temperature overnight, and then glaze for the scones. For scones that are a little smaller, you can cut a large dough disc into eight triangles. The baking time for the smaller scones will need to be adjusted to 10-12 minutes. For more tips and tricks, please see blog post.




Charlotte says
These look absolutely scrumptious! I have them on my baking list for the weekend! Thanks for sharing the detailed tutorial!
Thanks, Charlotte! I hope you love them!
Joy says
The crumb on this scone is perfection! Not too dry, not too moist. It melts in your mouth with all the right flavors! If I said that this recipe is better than Paneras orange scone, would you believe me?! It’s just that good!
Laura says
This looks amazing! Can't wait to try
Thanks, Laura! Can't wait to hear what you think of this recipe!
Braghan says
These look scrumptious! I can't wait to make these for my next girls' night!
Julie C. says
This recipe is spot on! Thanks for another great recipe!
My pleasure, Julie!
Deepti says
These orange scones look so addictive!! can't wait to make these for my daughter!
Karina says
Great tutorial on how to make them. I will definitely try your trick on grating the butter to make them more flaky. Look so delicious, airy and light.
Tressa says
I have always been so apprehensive about making scones because I am not much of a baker, but these were so easy and delicious.
Tiffany says
An orange scone sounds delightful and that glaze 😀
Crystal says
I just recently had a orange scone from Panera! So good, can not wait to try this recipe, glad I found it.
Quick question? Could this recipe be used in scone pans. I have a mini scone pan and am actually looking to get a bigger scone pan.
Since this recipe doesn't require a pan, I don't know how it would work. But if you try it, please let me know. Hope you love the recipe!
Carolina says
Unbelievable!.Followed it as directed especially about adding the orange juice a little bit at a time to get the right consistency for the glaze. I didn't have orange extract so I added a little bit of orange zest to the dough, and it was soooooo good!
Thank you so much for sharing.
Thank you so much for your comment! I'm so glad you liked these scones!